In recent years, I’ve tried several NAS systems: Synology, QNAP, NextCloud, and OpenMediaVault. I can only advise against Synology and QNAP; you pay a lot of money for a more or less nice enclosure, but the underlying software is outdated, and the performance compared to open-source alternatives is subpar.
Two open-source alternatives are NextCloud and OpenMediaVault. They have a major disadvantage: you can’t buy them with hardware. The software is available for free online, but you have to source the hardware yourself. This is, of course, a hurdle. I’ve had very good experiences with NextCloudPi. It’s like a local Dropbox at home for very little money. However, strictly speaking, NextCloud is not a NAS but just cloud software. Setting up a shared folder that you can mount as a drive involves a bit more effort. But it does offer software that you can install on your phone and computer to sync part of your hard drive.
OpenMediaVault offers exactly that: a hard drive on your own network, but lacks what NextCloud offers. There’s no software for mobile or desktop, drives must be manually mounted, and nothing gets synchronized. OpenMediaVault requires Debian, whereas NextCloud is more flexible. However, OpenMediaVault isn’t particularly resource-hungry. I haven’t yet been able to stress my installation on the Raspberry Pi 4 with 2GB. Outside the network, you can only access your files via VPN, which is not included and must be installed either through the router or another system. OpenMediaVault is compatible with Apple TimeMachine!
To summarize, I would describe it like this:
Avoid buying systems as much as possible and save a lot of money.
NextCloud is great if you want an alternative to a cloud service.
OpenMediaVault is good if you need shared drives.
For both systems, NextCloud and OpenMediaVault, you still need some other system to back up your data. Yes, you may have your data stored locally on a second medium, but if your house burns down, you have a problem.
After removing the Raspberry Pi 4 from my kids’ Phoniebox and replacing it with a less power-hungry Raspberry Pi 3, I was looking for my next project. I’ve since moved away from NextCloudPi, as managing it with the iPad/iPhone/Mac was just too cumbersome. However, I’ve been wanting to replace the QNAP for a long time, and I’ve always wanted to try OpenMediaVault as a file server, including for TimeMachine backups.
The QNAP Mispurchase
What bothers me about the QNAP? I had bought the TS-431X2 for over €500, and it has a Quad-Core AnnapurnaLabs Alpine AL-314 1.7 GHz processor. Using Docker on it is not enjoyable, which was actually one of the reasons I bought the QNAP NAS. Unfortunately, the QNAP wasn’t much faster than the Synology I had before. But the worst part was the outdated libraries, especially with regard to the web server. You can install NextCloud with a lot of workarounds, but it’s far from user-friendly, and the support was not very helpful. And then there were constant error messages or warnings popping up.
In addition, setting up shared folders and so on is also quite complicated. I just got frustrated with the thing.
Is OpenMediaVault Better?
First of all, it’s different. OpenMediaVault is NAS software, but unlike QNAP or NextCloud, it doesn’t offer desktop syncing. You can’t buy ready-made hardware, plug it in, and have it work. It’s certainly not suitable for average users, but they probably wouldn’t buy a NAS from QNAP anyway 🙂
If you know a little about Linux, the installation is relatively simple:
Flash Raspbian Buster Lite (or whatever comes next) onto a microSD card. Raspberry Pi provides an installer for Mac and PC. Just make sure to choose the Lite version, not the standard Raspbian.
Copy an empty file named ssh to the boot volume so you can log in via the terminal (assuming you have an Ethernet connection).
Insert the card and start the Raspberry Pi.
Then find the IP address of the Raspberry Pi and log in with:
My 1TB SSD was immediately recognized, but it had to be formatted and then mounted.
First Problems
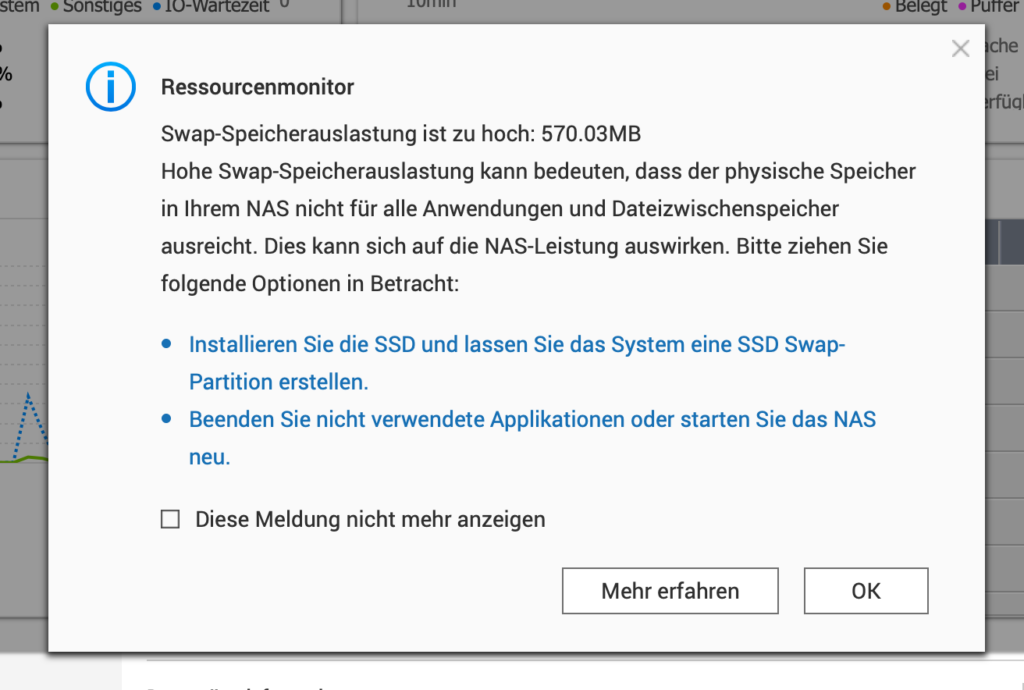
Unfortunately, that was the end of the easy steps. For example, Sonos wouldn’t connect to OpenMediaVault. The trick is that you need to change the SMB configuration. This can be done in the interface. I was also a bit shocked at first by the following error message:
It couldn’t get much more dramatic. At first, I thought I had encountered a kernel panic. However, the error message only indicated that the session had expired.
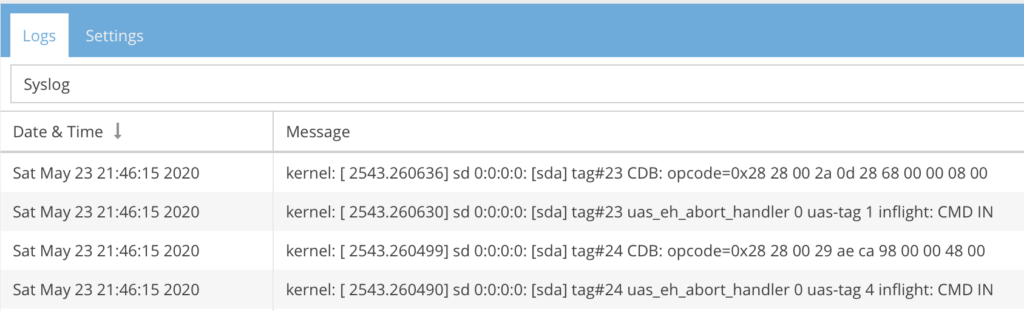
Then came network connection drops, adding to the initial problems. And these were serious. My SanDisk 1TB Ultra SSD is brand new, but apparently, the Raspberry Pi 4 doesn’t like the adapter:
UAS_EH_ABORT_HANDLER is an error message you don’t often see. A bit of research shed some light on the issue. By the way, the change in /boot/cmdline.txt should actually be at the beginning of the line and not create a new line. If you do it the wrong way, the Raspberry Pi won’t boot anymore—I’ve already tried that for you 🙂
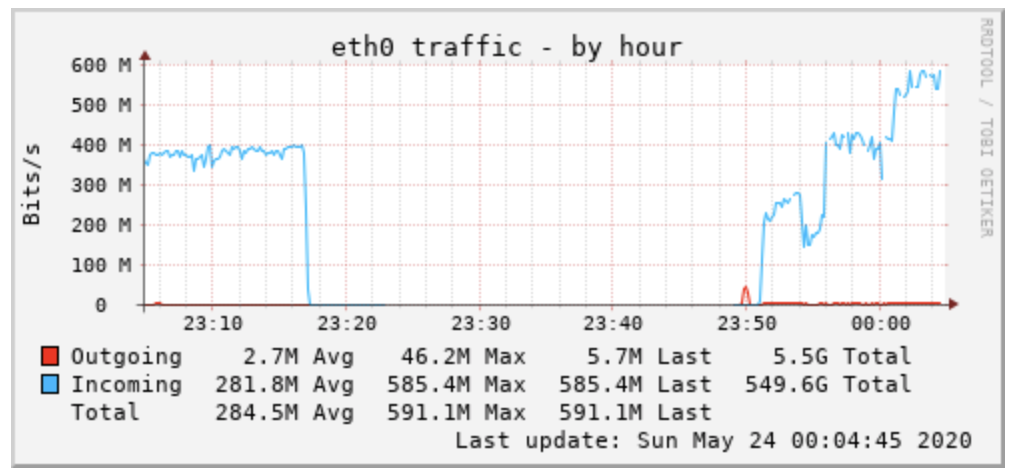
As slow as it was expected to be, the connection is not that bad now despite the quirk:
Just under 600 Mbps is something I’ve rarely seen, of course, this was measured on the Ethernet adapter, so it might not be as fast when writing to disk. But at least I haven’t had any network dropouts so far. What stands out is that the RAM is used much less than with the QNAP. And on the Raspberry Pi, I can even run R 🙂
Conclusion
Unfortunately, there is still no suitable case for my intended project. I’d like to fit the Raspberry Pi plus 2 SSDs into a case. That would obviously be a good excuse to finally buy a 3D printer, but honestly, I don’t have time for another hobby.
Overall, this setup with the Raspberry Pi and OpenMediaVault makes a good impression. For a fraction of the cost (under €100), you get more performance than with the expensive QNAPs or Synologys of the world.
After almost 2 years, I put my 3 Google Wifi Pucks – retired – on eBay. The first problems had already arisen a year ago, when one of the pucks had stopped working from one day to the next. It still worked, but it could no longer connect to the main access point on the other side of the wall. Even if he was standing right next to the other puck, he didn’t want to connect reliably anymore. The Google Wifi Puck was immediately replaced by Google, but the problem was not solved. Most likely, another network had spread in the neighborhood, and in fact, the neighbor below me had gotten a new, strong Wi-Fi. The automatic switching of channels is a nice theory, but it doesn’t really work well. Although the Wifis change their channels from time to time, but only to hang out together on the same channel.
When we were renovating this apartment in the almost 150-year-old house, the electrician asked us if we didn’t want Ethernet to be laid. “No, why, I have WIFI?” I said, and that was one of the worst decisions I’ve ever made. With 8 Sonos boxes, 3 to 5 mobile phones, 1 tablet, several smart home devices such as those from tado and lots of other devices in the WLAN, there is already a lot of stress here. The solution to my WLAN problem should therefore be PowerLine adapters from tp Link. These supposedly transmit up to 1,300 Mbit/s, and of course this is a theoretical value. In fact, however, they actually managed between 200 and 950 Mbit, depending on the room. Only in the study, where I needed the net the most, the connection was very insecure. Either it wasn’t there at all, or it fluctuated between 8 and 200 Mbit/s.
Since I am currently spending a little more time in the study (after the book is before the book), the poor WIFI connection was getting more and more annoying. And constantly connecting the Ethernet adapter (it has to be connected to the old Thunderbolt port on my MacBook Air, because the USB adapter only manages 100MBit/s), well…. Yesterday evening, the network kept failing, and then I looked again for other mesh networks. I had already read some good things about the Netgear Orbi. At 0:58 on Saturday morning I ordered the NETGEAR Orbi High Speed Mesh WLAN System RBK50-100PES (3,000 MBit/s Tri-Band Mesh Router + Satellite Repeater, 350 m² coverage) from Amazon, at 11:58 on the same day I had picked it up from an Amazon Locker station (Thanks, Amazon! Actually, this should not be delivered until after the weekend, but on the same day is already very nice).
Less than an hour later, it was set up. It’s not as easy as with the Google Wifi. The app is less understandable, some settings such as port forwarding can only be made in the browser. But the speed… the satellite is now in the study, and since then I have not had a single break. Better yet, the speed is better than what I’ve ever had. In the screenshot on the left you can see a Tx rate of 867 MBit/s. This seems to be the maximum my old MacBook Air can do on the 5 GHz band. Of course, we are not yet at the 3,000 Mbit/s that the network theoretically offers. But, to be completely honest, who should the MacBook connect to? My NAS has a 10 GBit Ethernet port, but is connected to a 1 GBit switch, to which the Orbi is also attached. My tests currently show a maximum speed of 330 MBit/s to the NAS when I write to an SSD there, which is a little more than 40 MByte/second. Not bad, if you consider that before I could only fear that my connection would last at all.
Of course, it’s no wonder that the Netgear device has more power on it: It’s a lot bigger, so there’s also more space for antennas in it. Yes, it’s more expensive compared to the Google Wifi, but for me it seems to be the solution to Wi-Fi problems, at least for now. The long-term test is still to come. Unfortunately, at least the Google Wifi pucks did not survive it.
Comments (since February 2020 the comment function has been removed from my blog):
Internet Speedtest says
November 2019 at 16:05 Hello, I also use a Netgear Orbi RBK53 system with 3000MBit/s. It is precisely these 3000MBit/s that I would like to briefly explain to you or how they are composed.
1733 MBit/s (4MIMO streams with 433 MBit/s each in the 5GHz network for the Orbi router and the satellite) You don’t see this network, that’s only for the internal connection. 867 MBit/s (2MIMO streams with 433 MBit/s each in the 5GHz network for the clients) 400 MBit/s (2MIMO streams with 200 MBit/s each in the 2.4GHz network for the clients)
1733 + 867 + 400 = 3000 Mbps (which you can never get on a client)
Have fun with your Orbi system! I will never buy anything else for Wi-Fi again…
The Synology NAS has a particularly great feature, namely encrypted backup in the cloud via Hyper Backup. After I had sworn off unencrypted cloud services (including Dropbox), the combination of encrypted backup and the cloud flat rate of Amazon Prime was so attractive. Unfortunately, the backup unfortunately ate up the entire bandwidth of the upload volume, 12 MBit. This speeds up the backup, but also slows down the Internet in the home network.
The “Traffic Control” in Synology DSM was supposed to remedy this, but this is where the problems started. First of all, you can’t choose Hyper Backup as an application whose bandwidth is to be restricted. If the need is great, then of course you can also select all ports and allocate less bandwidth to them, for example 2,000 KB/s. And this is exactly where the mistake lies.
First of all, the port 443 of the destination folder must be selected, this is the port used by Amazon (and probably other services as well). And then comes the biggest misunderstanding, because 2,048 KB/s is not 2 MB/s, but something else that I haven’t understood so far. Because if I select 500 KB/s, then the NAS uses 5 MB/s.
How can that be? Maybe KB/s don’t mean kilobytes/s at Synology, but kilobits/s? But that wouldn’t be 5MBit/s, which Google Wifi now shows in the app.